There have been many posts about enabling both incoming and outgoing email in Sharepoint. the process is pretty simple as the Share point Central Administrator basically talks you through the steps involved. However, when this is done on Server 2008 and Microsoft Exchange is not currently being implemented as the email solution, it gets a little bit trickier.
Pre-Requisites for using AlertingFirst off all make sure you have enabled the SMTP for the Email account you are going to use with the TFS 2010 Email Alert Functionality. This can be Done through a service request to Microsoft Support through your Exchange admin account!Testing your SMTP Server Ports from the TFS Server
Here we need to validate that we can successfully contact our Exchange Online SMTP Server as we are using the Exchange Online from Microsoft the SMTP server that we use is smtp.mail.microsoftonline.com with Port 587.
- Add the Telnet Client on your Server using Server Manager
- Open an elevated CMD prompt
- Type telnet “smtp.mail.microsoftonline.com” 587 (without quotes)
If not then you may need to configure your windows firewall as below
To enable SMTP for the Windows Firewall in Server 2008, do the following:
- Open the Windows Firewall via Start –> Run –> firewall.cpl
- In the left hand pane, click Advanced settings
- Click Change Settings
- Highlight Outbound Rules
- Under Outbound Rules in the Actions pane, click New Rule
- Select Port and click Next
- In the textbox for Specific remote ports, enter 587
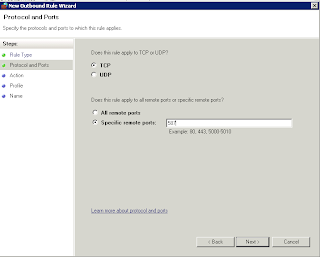
Finish the configuration by clicking Next and you will now have the firewall port opened for outbound SMTP. Unless you are using a Telnet Server, you shouldn’t need an inbound rule. Try your telnet test again from the steps above.
Next you need to add the SMTP Server Features
Go to the Server Manger and add SMTP Server Feature as Shown below
Now you need to Configure SMTP Virtual Server under IIS 6.0
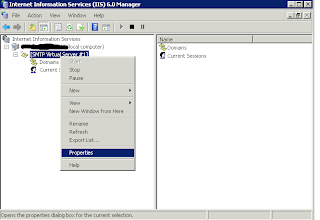
Go to Start -> Programs -> Administrative Tools -> IIS 6.0 Manger
Under Right click SMTP Virtual Server and select properties
Go to "Access" Tab Select "Relay" Add your Server IP Address as below
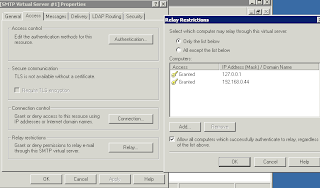
Click OK,
Then go to Delivery Tab and select Outbound Security and enter your smtp enable email account and password under Basic Authentication and make sure you check TFS encryption.
Click OK
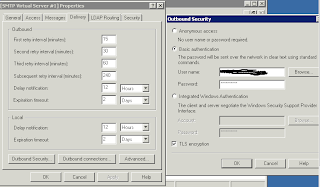
Under the Outbound Connection set your TCP Port as 587 Click OK.
And under the Advanced Tab Enter the smart Host as "smtp.mail.microsoftonline.com" (without Quotes)
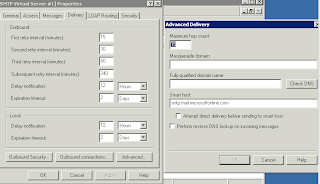
Click OK. and click OK on the Properties Window and you are done!
Now Open the Share point Central Administration and go to system settings
Click Configure Outgoing Email Settings under E-Mail and Text Messages (SMS)
Under Outbound SMTP Server Enter "Your Machine Name or FQDN"
Under From Address Enter 'Your POP Enabled Email Account"
Click OK.
Your are done If every thing above is configured Properly you should be able to send Alerts.
Thank You.


No comments:
Post a Comment